
You’re all set to wear your favorite dress, but you realize it’s just a tad too long and keeps trailing on the floor as you walk. However, you don’t want to give up on the style and don’t have a backup outfit. Don’t worry, you don’t have to spend hours sewing or take a trip to the tailor to fix it. With some clever shortcuts, you can adjust the length yourself, and that too without any sewing skills. You can do it within minutes. Wondering how to shorten a dress without sewing? Let me guide you through some simple and easy ways to do it.
Whether you need to hem a maxi dress for an impromptu beach date or take up the skirt on a cocktail number for that party across town, these sewing-free solutions will have you looking runway-ready in minutes flat. From temporary pins and tucks to more permanent tape and glue, we’ve got you covered stem to stern.

Supplies You’ll Need to Shorten a Dress Without Sewing
Before diving into specific shortening techniques, assemble a few key supplies:
Sharp Scissors
A solid pair of craft scissors allows cleanly cutting any loose threads or uneven edges. Sharp points easily maneuver curved hemlines too.
Straight Pins
The more pins the merrier for temporarily hemming fabrics. Stash various sizes for tackling everything from chiffon to denim.
Hem Tape
Double-sided hem tape fuses fabric together with heat. It creates a flexible, finished look. Check the tape’s temperature requirements before ironing.
Liquid Hem Sealant
Clear glue-like sealants bond the folded hem securely. Ensure the formula works on your fabric type first.
Iron
Heat activates many no-sew hemming products. Grab a travel size iron for on-the-go fixes.
Sewing Gauge Tool
This measuring stick uniformly marks hem allowance as you go. DIYers can substitute a ruler.
How Short to Go: Finding the Right Length
Before slimming down your dress, ponder the intended occasion and how much real estate to remove. Taking things up too far risks compromising the original design or making you uncomfortable.
As a general guideline, here’s how much hem to let out for common events:
Black Tie
Floor-length is preferred, but tea-length (mid-calf) also works
Cocktail Attire
Knee-length or tea-length
Business Casual
Just above or below the knee
Casual Summer
Above the knee (try the fingertip test – hem hits where fingers fall when arms at side)
Beach Wedding
Mid-calf or ankle length
If still unsure, start conservatively with just an inch or two then reevaluate. Many no-sew techniques make further adjustments easy anyway.

How to Shorten a Dress: 8 Sewing-Free Methods
Ready to revise that hemline? Try these clever shortcuts for DIY dress alterations.
1. The Classic Fold & Pin
The most basic no-sew technique, folding and pinning, temporary secures excess length out of sight. It takes just minutes but doesn’t last through active wear.
What You’ll Need
- Sharp scissors (for evening any raw edges)
- Straight pins
- Sewing gauge tool or ruler
- Tailor’s chalk (optional, for marking fold line)
Step By Step
- Have the dress wearer try on the garment, preferably with the same shoes planned for the event. Stand comfortably with weight evenly on both feet.
- Decide on ideal finished length based on event formality, shoes, and personal preference. Mark with pins or tailor’s chalk. For floor-length dresses, leave a 1/2 inch allowance to prevent dragging.
- Remove dress and smooth out on a flat surface. Use your gauge tool and chalk to mark the desiredfinished length all the way across, creating a fold line parallel to original hem edge.
- Fold under resulting excess fabric twice so raw edges hid inside, making the fold roughly 1/4 inch wide.
- Insert pins perpendicular to the fold, spacing every 2-3 inches. Push through all fabric layers for security.
- For curved hems, gently ease fullness in or out to avoid rippling. Add extra pins at seam intersections.
- Carefully try on dress again, checking for even length all around and that folded hem stays put. Remove any visible pins before wearing.
Folding a dress hem delivers a quick shortened style perfect for lightly worn pieces. For frequent or active wear, try more permanent hem finishing methods.
2. Clip It Up Temporarily
For sudden hem mishaps, utilizebinder and paper clips, bobby pins, and small clothespins to rapidly reduce dress length. Group multiple clips on thicker fabrics. While ultra-temporary, clipping offers emergency relief and reversible length changes.
3. Make a Quick Tuck
For slight over-length on casual dresses, make a discreet tuck under the bustline or at the waist. Secure with clasps or elastic bands if needed. This customizable take-in simply pulls excess fabric up into the dress itself rather than shortening the actual hemline.
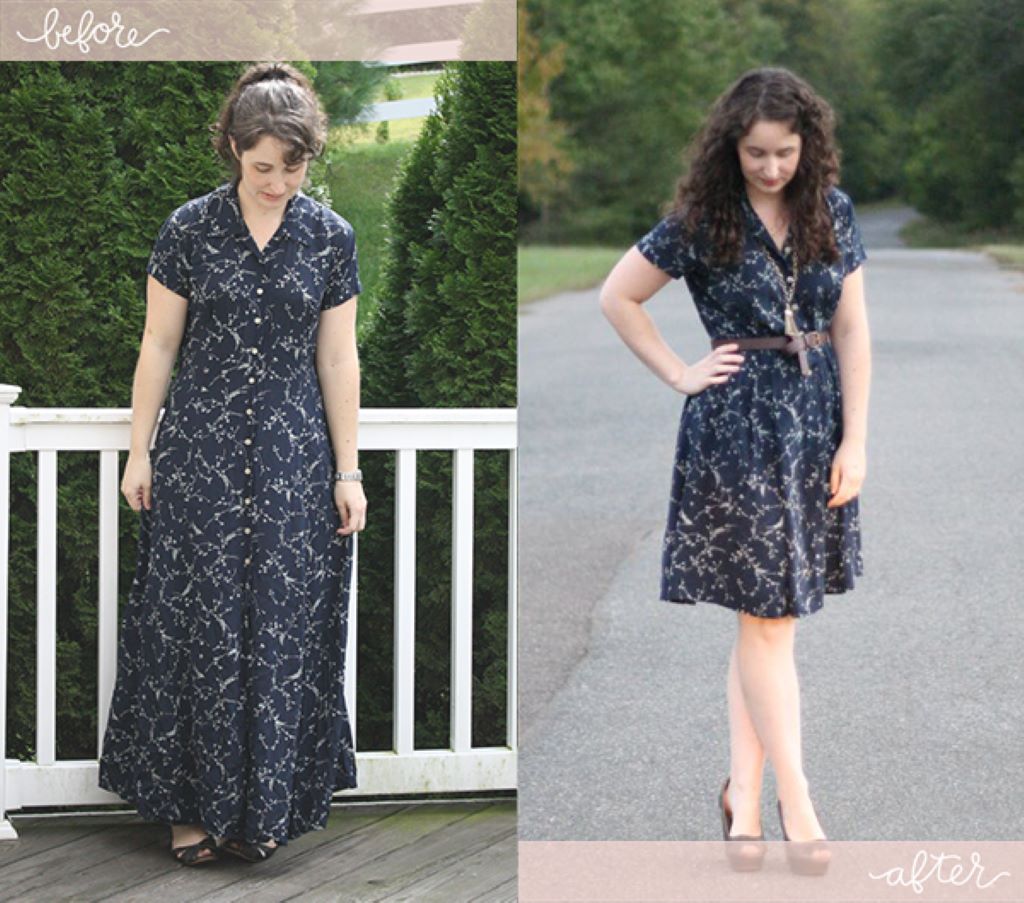
4. Cinch It With a Belt
Cinching a belt, sash, or other accessory at the waist or hip instantly hikes up the skirt several inches by gathering the fabric closely against the body. Choose ties wide enough to produce the shortened look but slim enough for your dress style.
5. Try Iron-on Hem Tape
Hem tape fused onto fabric with an iron delivers a polished shortened hem in minutes. The tape’s heat-activated adhesive bonds fabric layers together without bulk. Most withstand washing without re-sewing.
What You’ll Need
- Iron and ironing board
- Double-sided hem tape
- Scissors
- Straight pins
- Sewing gauge tool or ruler
- Press cloth
Step By Step
- Mark your ideal finished length on the dress with pins or chalk. Account for shoe choice.
- Remove the dress and lay flat on work surface with the inside of the garment facing up. Use a gauge tool to evenly measure and mark the dress hem at your pre-selected shorter length.
- Fold under the excess fabric along chalk line to create the hem allowance. Press flat but avoid creases. Unfold hem.
- Cut a length of hem tape slightly longer than dress hem edge. Remove paper backing. Align tape adhesive-side down just below the fold line. It should adhere about 1/8 inch from hem raw edge.
- Remove remaining paper backing. Fold marked hem allowance up over tape to encase raw edges. Pin if needed.
- Place cloth over dress front and gently press tape through fabric layers with iron to fuse the seam. Don’t slide iron and avoid overheating fabrics.
- Check tape bonds hem at correct length all around dress. Make any adjustments. Allow to fully cool before wearing or washing.
Hem tape works well on straight hems and stable wovens like cotton. Try liquid sealants for securing curved style lines and delicates in the wash.
6. Glue Down Seam Allowance
Liquid hem sealants invisibly glue the folded hem allowance to the dress underside for a customized shortened look. Flexible when dry, the best formulations withstand machine washing without yellowing or stiffening fabrics.
What You’ll Need
- Liquid hem sealant
- Small paintbrush
- Scissors
- Straight pins
- Sewing gauge tool or ruler
- Wax paper
Step By Step
- Have dress wearer try on the garment and decide on ideal finished length. Mark with pins or chalk.
- Remove dress and smooth flat on work surface with inside face up. Measure and mark the new folded hem position with pins or chalk.
- Fold under hem allowance along marked line and press. Unfold hem. Cover work surface under dress with wax paper to block drips.
- Apply a thin, even line of sealant along the dress right side where hem allowance will fall, about 1/8 inch from raw edge. Avoid globs. Let dry completely.
- Fold hem allowance back to encase raw edge. Pin if needed. Apply a second sealant line along the inner folded hem edge.
- Fold hem back in place and use a press cloth to gently fuse layers with an iron, no steam. Allow to fully cure overnight before wearing or washing.
Liquid sealants work on most fabric types but test fragiles like silks first. Remove dried drips with nail polish remover. Store glue upright and shielded from light between uses.
7. Make a Bra Tuck
Create hidden dress length Room by discreetly tucking excess fabric up into your bra. Simply anchor to cups edges or slide between bra and body. This quick take-in stays put on the move and won’t damage delicate fabrics.
8. Hide It in Your Waistline
For a smooth, customizable shortened look, carefully tuck hem allowance upward and inward, fanning fabric across your midsection. Front-flatten excess length into waistbands or cinch it all around with a narrow belt.
No-Sew Hemming Tips & Troubleshooting
While sewing-free shortening solutions require few materials, they do demand proper preparation and application for attractive results across different dress fabrics and styles:
Mind the Iron
When heat fusing trims and tapes, hover iron just above fabric rather than pressing down to avoid scorch marks. Always use manufacturer recommended settings. Start cooler on synthetics and other delicate or special occasion fabrics, slowly increasing temperature as needed. Slip a plain cloth between iron and dress as added insulation.
Control Curves & Gathers
Whether pinning or gluing, gently ease out fullness on deep curved and gathered hems to prevent rippling. Use smaller hem allowances here and add a few extra anchor pins. If ruffles still persist, consider taking things up a little shorter.
Consider Weight & Use
Sheer chiffons, soft satins, and lightweight fabrics hold shape best with temporary folding or pinning versus heavy bonding. Save the liquid seam sealants and heat fusing products for medium to heavy cottons and canvas blends better able to hide bulk. Know that trim tapes weaken over time with frequent wearing and washing.
Lengthen Taping at Zippers
When hemming side seams interrupted by dress zippers, extend hem tape several inches above and below the closure rather than stopping at the tracks. This helps reinforcement against separation when dressing. Just be sure tape width doesn’t show beyond the new hemline.
Expert Dress Alteration Without Sewing in Minutes
Hopefully the simplified tutorials above empower you to overhaul the length on any dress without a needle in no time at all. Here’s a quick summary of the essential dress shortening steps:
Determine best finished length based on event and shoes Prep supplies – tape, glue, pins, scissors, etc. Decide on method based on fabric properties On inside hem, measure & mark new fold line Finish raw edge so it hides within fold
Secure allowance upward with binding method Check drape and make final adjustments Let adhesives fully cure if needed before wearing Now put those finishing touches on your outfit so you can dance, strut, and pose confidently all night long without worrying about messy maladjusted hems. Go rock that newly shortened dress!
FAQs
Can any dress be shortened without sewing skills?
Yes! Whether made from silky chiffon and lace or thick woven tweed, virtually all dress fabrics can be adjusted shorter using strategic folding, pinning, pleating, hemming adhesives, and other stitch-free tricks. Just select the best method for each material’s properties.
How much does it cost to shorten a dress without sewing?
If using household materials like scissors and straight pins already on hand, hemming a dress sans needlework is practically free! Investing in specialty trim tapes, fabric glues, or small tools like a mini iron expands project budgets slightly at just a few dollars each.
Can I remove shortened dress hems later on?
One perk of no-sew dress hemming is the flexibility to reverse steps when needed. Pinned styles easily length back out by extracting fasteners.
How short can I make a dress without sewing?
When debating just how far to take things up, consider dress architecture, fabrication, and intended wearing. Overly aggressive alterations throw off original proportions, compromise structure, and make garments unwearable.
Will my shortened dress hem stay up all day or night without stitching?
How securely your adjusted dress length holds depends greatly on method. Temporary folding and pinning works well for quick photo ops or limited seated wearing but stays iffy on the dancefloor.
Summarized Takeaways
While advanced sewers may perfect complex alteration techniques like adding layered flounces to inject new life into tired dresses, even novices can quickly spruce up stale styles using basic no-stitch shortcuts. Here’s a review of vital ideas for how to shorten a dress without sewing:
- Assess optimal finished dimension based on fabric, current fashion, event formality, and personal fit preferences before launching adjustments. Remember less is more!
- Prep necessary tools beforehand like sharp scissors, straight pins, measurement aids, and any specialty fastening products selected for the project based on dress material textures and weights.
- Neatly measure and mark the new target hemline evenly across the inner dress length prior to reductions. Add wearing ease allowances if temporarily folding only.
- Handle delicate fabrics gently while completing any no-sew steps, easing rather than pulling excess fullness toward raw edges. Insert plenty of small pins to secure.
- Fuse hems tapes or apply liquid sealants very sparingly using light adhesive pressure to prevent stiffness or residue buildup on facings over time.
- Always test new shortened lengths on scraps first before cutting or fusing directly on expensive dress fabrics. Confirm heat or adhesion applications cause no damage either.
- Check the adjusted finished length all the way around the dress interior before final wearing for any uneven spots or loose sections needing extra pins or seals.
The right preparation paired with realistic technique choices lets anyone update their dress dimensions quickly without requiring advanced sewing skills or equipment, and when it comes to mastering the art of wearing pencil skirts, follow these tips for shortcut hemming confidence!


